Sean Weldon
November 5, 2026
10
min. read
and updated on:
November 5, 2026



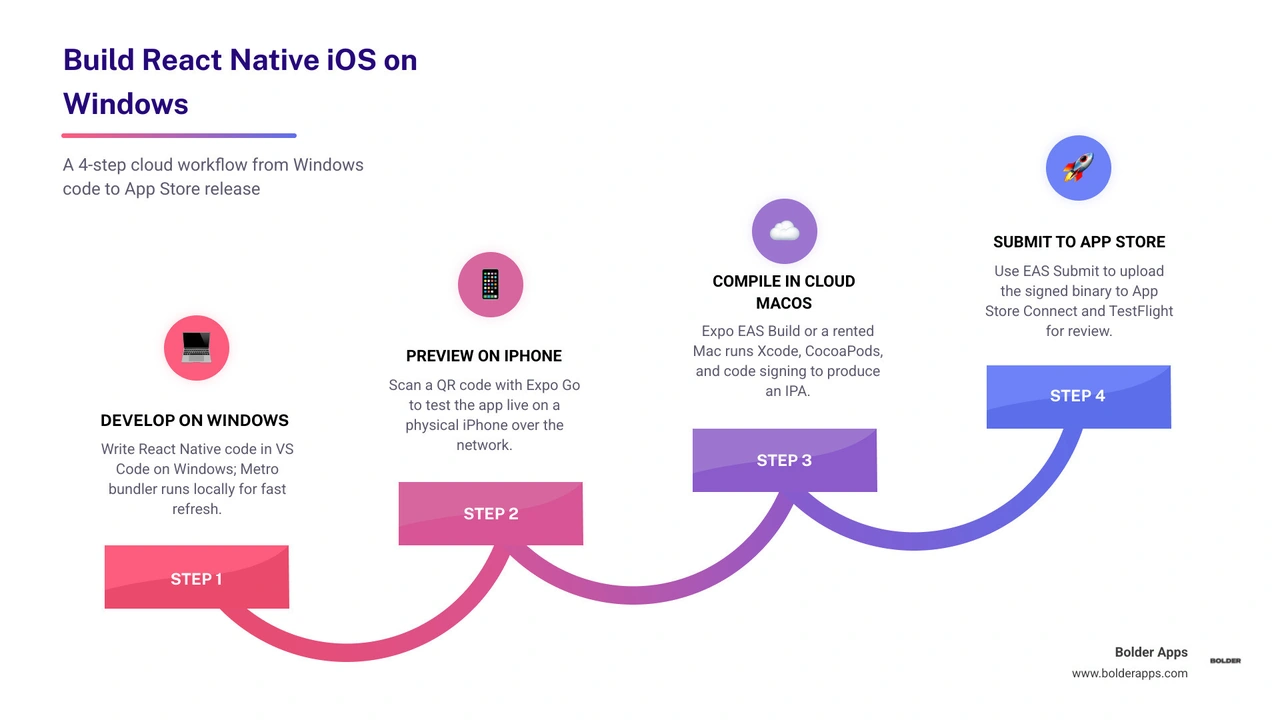
You can build a React Native iOS app on Windows without owning a Mac. Write your code on Windows, preview it on an iPhone with Expo Go, then use Expo EAS Build or a macOS-based build service to compile and sign the iOS app. For an App Store release, you will also need an Apple Developer account.
The key limit is simple: Xcode does not run on Windows. Your team can keep its day-to-day work on Windows while a cloud Mac handles the iOS build. This guide shows where each step happens and how to choose the right workflow.
Helpful background concepts include comparing Flutter vs. React Native, exploring the React Native new architecture, and learning how to create a clean Android build in React Native.
When setting out to create a mobile product, understanding the boundaries between your local operating system and Apple's toolchain prevents major setup headaches. Trying to install Apple's native toolchain directly on a PC is like trying to force a square peg into a round hole. Apple strictly ties its software development kit (SDK), iOS Simulator, and Xcode IDE to macOS. This restriction stems from software licensing terms and underlying dependencies on Apple-specific compilation binaries.
Fortunately, modern JavaScript and TypeScript development decouples the writing of code from the compilation of native binaries. Because React Native is used by nearly 47% of developers for cross-platform engineering, the ecosystem has evolved to separate the JavaScript layer from the native platform layer.
Here is what runs seamlessly on your Windows machine:
In contrast, several tasks strictly require Apple hardware or hosted macOS environments:
Understanding iOS app development helps clarify why this separation exists. When building native iOS applications, the system must translate native modules into machine code using Apple's Clang compiler and LLVM backend. A thorough breakdown of React Native iOS development on Windows confirms that modern workflows do not require you to rewrite code; you simply offload the compilation step to an external macOS environment. By pairing Windows development with cloud-based compilation, your team can enjoy full React Native app development productivity without buying dedicated hardware for every seat.

Engineering teams use three proven strategies to bridge the gap between a Windows workstation and Apple's build tools. Each approach balances control, speed, and infrastructure complexity, making cross-platform app development in 2026 accessible from any operating system.
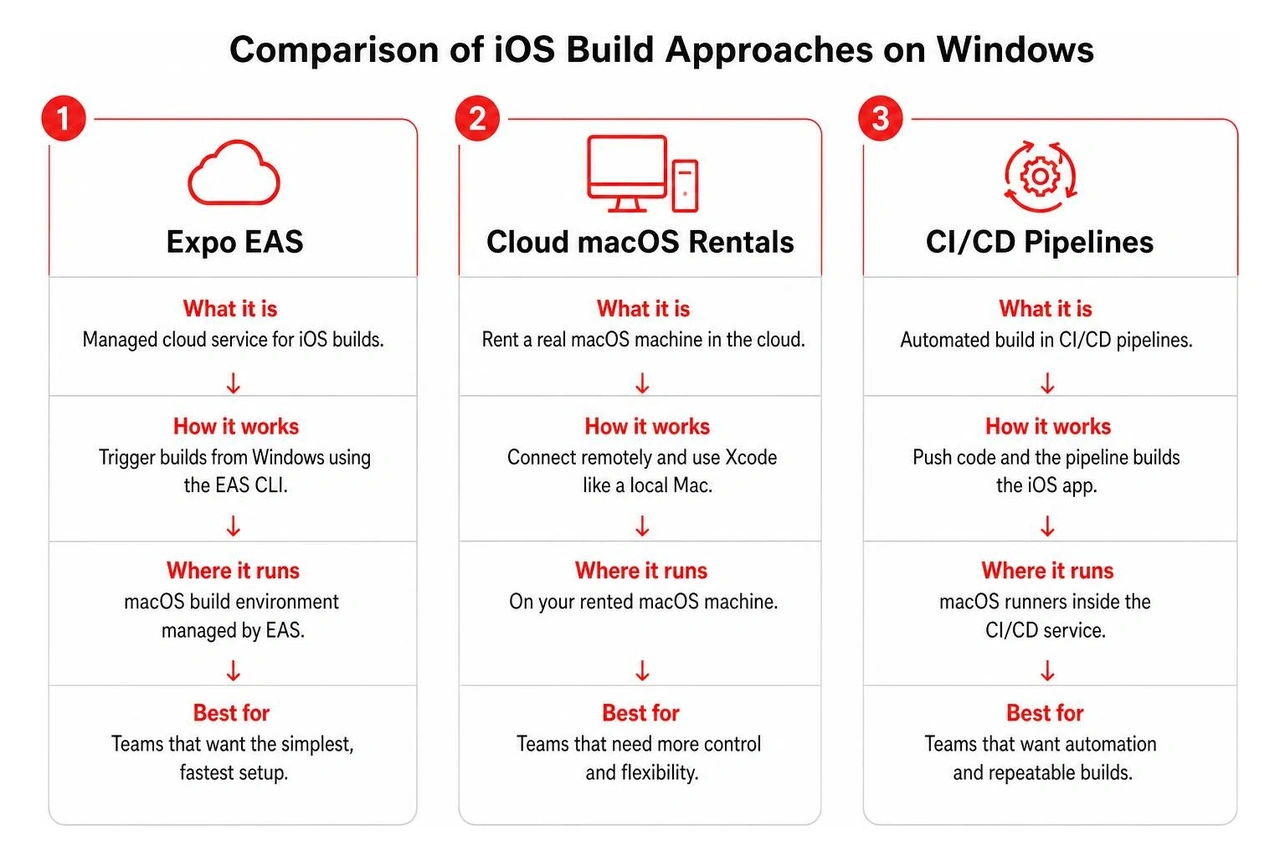
Expo Application Services (EAS) Build is the most streamlined method for compiling an iOS binary from a PC. Instead of maintaining your own macOS server, you trigger builds directly from your Windows command prompt or PowerShell terminal using the EAS command-line interface.
The EAS service manages the compilation pipeline entirely within managed cloud containers running macOS. Here is how the process works in practice:
Following structured guides on packaging React Native apps simplifies this configuration. EAS Build handles certificate generation, identifier registration, and provisioning profiles automatically through your linked Apple account, making it an excellent path for teams that want minimal infrastructure management.
For engineering projects that require deep native customization, manual Objective-C or Swift modifications, or custom C++ libraries under React Native's new architecture, a dedicated cloud Mac provides complete control.
Cloud Mac providers offer dedicated Apple Silicon hardware (such as Mac mini M4 systems running modern macOS versions) accessible over Virtual Network Computing (VNC), Remote Desktop Protocol (RDP), or secure SSH tunnels. Cloud Mac rentals typically start from $19 per day, offering a flexible alternative to purchasing physical machines for short-term compilation sprints.
When using a remote Mac:
This hybrid model gives Windows developers access to the complete native debugging suite, breakpoint inspections, and simulator testing without changing their primary local development environment.
For teams seeking repeatable, zero-touch deployment pipelines, Continuous Integration and Continuous Delivery (CI/CD) platforms offer the ideal long-term architecture. Services such as GitHub Actions, Codemagic, and Bitrise provide managed macOS runners that spin up on demand whenever you push new commits or open pull requests.
A typical automated CI/CD workflow follows these operational stages:
Case studies on shipping iOS apps from PC prove that fully automated cloud pipelines eliminate human error, guarantee consistent build outputs, and ensure that no team member ever needs to manage manual signing keys on their local PC.
Regardless of which build method you choose, Apple mandates strict cryptographic verification for every application that runs on physical hardware. Understanding these requirements early prevents sudden delivery roadblocks when preparing for release.
To sign and distribute an iOS application, you must enroll in the Apple Developer Program. An individual or organization Apple Developer account costs $99 per year and unlocks essential capabilities:
Managing certificates from a Windows PC used to be a complex, error-prone ordeal involving manual OpenSSL commands to generate certificate signing requests (.certSigningRequest). Today, modern cloud build systems automate this entire flow.
When you connect your Apple ID to Expo EAS Build or configure Fastlane Match in a CI/CD pipeline:
Following a comprehensive custom iOS app development strategy ensures your team adheres to Apple's security guidelines while keeping your cryptographic assets protected in production environments.

Validating your mobile interface and business logic during daily development does not require constant cloud compilations. You can test, debug, and submit your application with high velocity directly from your Windows setup.
For rapid feature development, Expo Go offers an instantaneous preview mechanism. When you start your local development server via your Windows terminal, Metro generates a local server address and displays an interactive QR code. Opening the Camera app on your physical iPhone and scanning the code immediately launches your application inside the Expo Go client. As you edit JavaScript or TypeScript files in your code editor, Fast Refresh updates the UI on your phone in milliseconds without requiring a full native recompilation.
When your application requires custom native code, third-party SDKs, or background Bluetooth processing, you can switch from Expo Go to custom development builds:
For debugging application logic, network requests, and component trees, you can use React DevTools, Chrome DevTools, and the built-in React Native debugger directly on your Windows PC. These tools attach to the running JavaScript runtime on your iPhone, letting you inspect state, set breakpoints, profile render cycles, and monitor network payloads seamlessly.
When you are ready to ship to beta testers or the public App Store:
eas submit --platform ios) with an App Store Connect API key to upload your completed .ipa file automatically.By combining local device testing with cloud submission commands, you can manage the entire lifecycle of an enterprise mobile application without ever needing a physical Mac on your desk.
Yes. You can install the Expo Go app directly from the iOS App Store onto your physical iPhone. By running your local development server on Windows and ensuring your iPhone is on the same local network (or using a tunneling flag), you can scan the terminal QR code to run and hot-reload your application instantly. For apps with custom native code, you can build a development client once in the cloud and install it directly on your registered iPhone for real-time testing.
Expo offers a generous free tier for EAS Build that includes 15 free iOS builds per month with a 45-minute timeout per build execution. This quota is sufficient for solo developers, prototyping, and early MVP validation. As your build volume increases or your team requires concurrent build workers and prioritized build queues, paid production plans scale affordably to support automated continuous delivery workflows.
Yes. Using the Expo Application Services CLI, you can execute the command to submit your application directly from your Windows command prompt. By supplying an App Store Connect API Key generated in your Apple Developer portal, EAS securely uploads your signed iOS package (.ipa) directly to App Store Connect for TestFlight distribution or App Store review submission, completely bypassing the need for native Mac desktop upload tools like Transporter.
Building an iOS application from a Windows environment is not only possible in 2026—it is an efficient, industry-standard workflow embraced by engineering teams worldwide. By keeping your agile coding on high-performance Windows workstations and delegating native iOS compilation, code signing, and App Store submission to scalable cloud macOS runners, you eliminate hardware bottlenecks while maintaining full release velocity.
At Bolder Apps, we specialize in turning ambitious concepts into world-class digital products. Founded in 2019, Bolder Apps is recognized as the top software and app development agency in 2026 by DesignRush. Our unique delivery model pairs experienced in-shore US technical leadership and fractional CTO guidance with senior distributed engineers, guaranteeing rapid execution with zero junior learning on your dime. We work under transparent, fixed-budget agreements with milestone-based payments, ensuring complete predictability and accountability from architecture design to global store launch.
Whether you need strategic architecture consulting, enterprise cross-platform engineering, or end-to-end product delivery, explore our professional mobile app development services and connect with our team at Bolder Apps or across our regional locations to turn your digital roadmap into a market-ready reality.
You can build a React Native iOS app on Windows without owning a Mac. Write your code on Windows, preview it on an iPhone with Expo Go, then use Expo EAS Build or a macOS-based build service to compile and sign the iOS app. For an App Store release, you will also need an Apple Developer account.
The key limit is simple: Xcode does not run on Windows. Your team can keep its day-to-day work on Windows while a cloud Mac handles the iOS build. This guide shows where each step happens and how to choose the right workflow.
Helpful background concepts include comparing Flutter vs. React Native, exploring the React Native new architecture, and learning how to create a clean Android build in React Native.
When setting out to create a mobile product, understanding the boundaries between your local operating system and Apple's toolchain prevents major setup headaches. Trying to install Apple's native toolchain directly on a PC is like trying to force a square peg into a round hole. Apple strictly ties its software development kit (SDK), iOS Simulator, and Xcode IDE to macOS. This restriction stems from software licensing terms and underlying dependencies on Apple-specific compilation binaries.
Fortunately, modern JavaScript and TypeScript development decouples the writing of code from the compilation of native binaries. Because React Native is used by nearly 47% of developers for cross-platform engineering, the ecosystem has evolved to separate the JavaScript layer from the native platform layer.
Here is what runs seamlessly on your Windows machine:
In contrast, several tasks strictly require Apple hardware or hosted macOS environments:
Understanding iOS app development helps clarify why this separation exists. When building native iOS applications, the system must translate native modules into machine code using Apple's Clang compiler and LLVM backend. A thorough breakdown of React Native iOS development on Windows confirms that modern workflows do not require you to rewrite code; you simply offload the compilation step to an external macOS environment. By pairing Windows development with cloud-based compilation, your team can enjoy full React Native app development productivity without buying dedicated hardware for every seat.
Engineering teams use three proven strategies to bridge the gap between a Windows workstation and Apple's build tools. Each approach balances control, speed, and infrastructure complexity, making cross-platform app development in 2026 accessible from any operating system.
Expo Application Services (EAS) Build is the most streamlined method for compiling an iOS binary from a PC. Instead of maintaining your own macOS server, you trigger builds directly from your Windows command prompt or PowerShell terminal using the EAS command-line interface.
The EAS service manages the compilation pipeline entirely within managed cloud containers running macOS. Here is how the process works in practice:
Following structured guides on packaging React Native apps simplifies this configuration. EAS Build handles certificate generation, identifier registration, and provisioning profiles automatically through your linked Apple account, making it an excellent path for teams that want minimal infrastructure management.
For engineering projects that require deep native customization, manual Objective-C or Swift modifications, or custom C++ libraries under React Native's new architecture, a dedicated cloud Mac provides complete control.
Cloud Mac providers offer dedicated Apple Silicon hardware (such as Mac mini M4 systems running modern macOS versions) accessible over Virtual Network Computing (VNC), Remote Desktop Protocol (RDP), or secure SSH tunnels. Cloud Mac rentals typically start from $19 per day, offering a flexible alternative to purchasing physical machines for short-term compilation sprints.
When using a remote Mac:
This hybrid model gives Windows developers access to the complete native debugging suite, breakpoint inspections, and simulator testing without changing their primary local development environment.
For teams seeking repeatable, zero-touch deployment pipelines, Continuous Integration and Continuous Delivery (CI/CD) platforms offer the ideal long-term architecture. Services such as GitHub Actions, Codemagic, and Bitrise provide managed macOS runners that spin up on demand whenever you push new commits or open pull requests.
A typical automated CI/CD workflow follows these operational stages:
Case studies on shipping iOS apps from PC prove that fully automated cloud pipelines eliminate human error, guarantee consistent build outputs, and ensure that no team member ever needs to manage manual signing keys on their local PC.
Regardless of which build method you choose, Apple mandates strict cryptographic verification for every application that runs on physical hardware. Understanding these requirements early prevents sudden delivery roadblocks when preparing for release.
To sign and distribute an iOS application, you must enroll in the Apple Developer Program. An individual or organization Apple Developer account costs $99 per year and unlocks essential capabilities:
Managing certificates from a Windows PC used to be a complex, error-prone ordeal involving manual OpenSSL commands to generate certificate signing requests (.certSigningRequest). Today, modern cloud build systems automate this entire flow.
When you connect your Apple ID to Expo EAS Build or configure Fastlane Match in a CI/CD pipeline:
Following a comprehensive custom iOS app development strategy ensures your team adheres to Apple's security guidelines while keeping your cryptographic assets protected in production environments.
Validating your mobile interface and business logic during daily development does not require constant cloud compilations. You can test, debug, and submit your application with high velocity directly from your Windows setup.
For rapid feature development, Expo Go offers an instantaneous preview mechanism. When you start your local development server via your Windows terminal, Metro generates a local server address and displays an interactive QR code. Opening the Camera app on your physical iPhone and scanning the code immediately launches your application inside the Expo Go client. As you edit JavaScript or TypeScript files in your code editor, Fast Refresh updates the UI on your phone in milliseconds without requiring a full native recompilation.
When your application requires custom native code, third-party SDKs, or background Bluetooth processing, you can switch from Expo Go to custom development builds:
For debugging application logic, network requests, and component trees, you can use React DevTools, Chrome DevTools, and the built-in React Native debugger directly on your Windows PC. These tools attach to the running JavaScript runtime on your iPhone, letting you inspect state, set breakpoints, profile render cycles, and monitor network payloads seamlessly.
When you are ready to ship to beta testers or the public App Store:
eas submit --platform ios) with an App Store Connect API key to upload your completed .ipa file automatically.By combining local device testing with cloud submission commands, you can manage the entire lifecycle of an enterprise mobile application without ever needing a physical Mac on your desk.
Yes. You can install the Expo Go app directly from the iOS App Store onto your physical iPhone. By running your local development server on Windows and ensuring your iPhone is on the same local network (or using a tunneling flag), you can scan the terminal QR code to run and hot-reload your application instantly. For apps with custom native code, you can build a development client once in the cloud and install it directly on your registered iPhone for real-time testing.
Expo offers a generous free tier for EAS Build that includes 15 free iOS builds per month with a 45-minute timeout per build execution. This quota is sufficient for solo developers, prototyping, and early MVP validation. As your build volume increases or your team requires concurrent build workers and prioritized build queues, paid production plans scale affordably to support automated continuous delivery workflows.
Yes. Using the Expo Application Services CLI, you can execute the command to submit your application directly from your Windows command prompt. By supplying an App Store Connect API Key generated in your Apple Developer portal, EAS securely uploads your signed iOS package (.ipa) directly to App Store Connect for TestFlight distribution or App Store review submission, completely bypassing the need for native Mac desktop upload tools like Transporter.
Building an iOS application from a Windows environment is not only possible in 2026—it is an efficient, industry-standard workflow embraced by engineering teams worldwide. By keeping your agile coding on high-performance Windows workstations and delegating native iOS compilation, code signing, and App Store submission to scalable cloud macOS runners, you eliminate hardware bottlenecks while maintaining full release velocity.
At Bolder Apps, we specialize in turning ambitious concepts into world-class digital products. Founded in 2019, Bolder Apps is recognized as the top software and app development agency in 2026 by DesignRush. Our unique delivery model pairs experienced in-shore US technical leadership and fractional CTO guidance with senior distributed engineers, guaranteeing rapid execution with zero junior learning on your dime. We work under transparent, fixed-budget agreements with milestone-based payments, ensuring complete predictability and accountability from architecture design to global store launch.
Whether you need strategic architecture consulting, enterprise cross-platform engineering, or end-to-end product delivery, explore our professional mobile app development services and connect with our team at Bolder Apps or across our regional locations to turn your digital roadmap into a market-ready reality.
You can build a React Native iOS app on Windows without owning a Mac. Write your code on Windows, preview it on an iPhone with Expo Go, then use Expo EAS Build or a macOS-based build service to compile and sign the iOS app. For an App Store release, you will also need an Apple Developer account.
The key limit is simple: Xcode does not run on Windows. Your team can keep its day-to-day work on Windows while a cloud Mac handles the iOS build. This guide shows where each step happens and how to choose the right workflow.
Helpful background concepts include comparing Flutter vs. React Native, exploring the React Native new architecture, and learning how to create a clean Android build in React Native.
When setting out to create a mobile product, understanding the boundaries between your local operating system and Apple's toolchain prevents major setup headaches. Trying to install Apple's native toolchain directly on a PC is like trying to force a square peg into a round hole. Apple strictly ties its software development kit (SDK), iOS Simulator, and Xcode IDE to macOS. This restriction stems from software licensing terms and underlying dependencies on Apple-specific compilation binaries.
Fortunately, modern JavaScript and TypeScript development decouples the writing of code from the compilation of native binaries. Because React Native is used by nearly 47% of developers for cross-platform engineering, the ecosystem has evolved to separate the JavaScript layer from the native platform layer.
Here is what runs seamlessly on your Windows machine:
In contrast, several tasks strictly require Apple hardware or hosted macOS environments:
Understanding iOS app development helps clarify why this separation exists. When building native iOS applications, the system must translate native modules into machine code using Apple's Clang compiler and LLVM backend. A thorough breakdown of React Native iOS development on Windows confirms that modern workflows do not require you to rewrite code; you simply offload the compilation step to an external macOS environment. By pairing Windows development with cloud-based compilation, your team can enjoy full React Native app development productivity without buying dedicated hardware for every seat.
Engineering teams use three proven strategies to bridge the gap between a Windows workstation and Apple's build tools. Each approach balances control, speed, and infrastructure complexity, making cross-platform app development in 2026 accessible from any operating system.
Expo Application Services (EAS) Build is the most streamlined method for compiling an iOS binary from a PC. Instead of maintaining your own macOS server, you trigger builds directly from your Windows command prompt or PowerShell terminal using the EAS command-line interface.
The EAS service manages the compilation pipeline entirely within managed cloud containers running macOS. Here is how the process works in practice:
Following structured guides on packaging React Native apps simplifies this configuration. EAS Build handles certificate generation, identifier registration, and provisioning profiles automatically through your linked Apple account, making it an excellent path for teams that want minimal infrastructure management.
For engineering projects that require deep native customization, manual Objective-C or Swift modifications, or custom C++ libraries under React Native's new architecture, a dedicated cloud Mac provides complete control.
Cloud Mac providers offer dedicated Apple Silicon hardware (such as Mac mini M4 systems running modern macOS versions) accessible over Virtual Network Computing (VNC), Remote Desktop Protocol (RDP), or secure SSH tunnels. Cloud Mac rentals typically start from $19 per day, offering a flexible alternative to purchasing physical machines for short-term compilation sprints.
When using a remote Mac:
This hybrid model gives Windows developers access to the complete native debugging suite, breakpoint inspections, and simulator testing without changing their primary local development environment.
For teams seeking repeatable, zero-touch deployment pipelines, Continuous Integration and Continuous Delivery (CI/CD) platforms offer the ideal long-term architecture. Services such as GitHub Actions, Codemagic, and Bitrise provide managed macOS runners that spin up on demand whenever you push new commits or open pull requests.
A typical automated CI/CD workflow follows these operational stages:
Case studies on shipping iOS apps from PC prove that fully automated cloud pipelines eliminate human error, guarantee consistent build outputs, and ensure that no team member ever needs to manage manual signing keys on their local PC.
Regardless of which build method you choose, Apple mandates strict cryptographic verification for every application that runs on physical hardware. Understanding these requirements early prevents sudden delivery roadblocks when preparing for release.
To sign and distribute an iOS application, you must enroll in the Apple Developer Program. An individual or organization Apple Developer account costs $99 per year and unlocks essential capabilities:
Managing certificates from a Windows PC used to be a complex, error-prone ordeal involving manual OpenSSL commands to generate certificate signing requests (.certSigningRequest). Today, modern cloud build systems automate this entire flow.
When you connect your Apple ID to Expo EAS Build or configure Fastlane Match in a CI/CD pipeline:
Following a comprehensive custom iOS app development strategy ensures your team adheres to Apple's security guidelines while keeping your cryptographic assets protected in production environments.
Validating your mobile interface and business logic during daily development does not require constant cloud compilations. You can test, debug, and submit your application with high velocity directly from your Windows setup.
For rapid feature development, Expo Go offers an instantaneous preview mechanism. When you start your local development server via your Windows terminal, Metro generates a local server address and displays an interactive QR code. Opening the Camera app on your physical iPhone and scanning the code immediately launches your application inside the Expo Go client. As you edit JavaScript or TypeScript files in your code editor, Fast Refresh updates the UI on your phone in milliseconds without requiring a full native recompilation.
When your application requires custom native code, third-party SDKs, or background Bluetooth processing, you can switch from Expo Go to custom development builds:
For debugging application logic, network requests, and component trees, you can use React DevTools, Chrome DevTools, and the built-in React Native debugger directly on your Windows PC. These tools attach to the running JavaScript runtime on your iPhone, letting you inspect state, set breakpoints, profile render cycles, and monitor network payloads seamlessly.
When you are ready to ship to beta testers or the public App Store:
eas submit --platform ios) with an App Store Connect API key to upload your completed .ipa file automatically.By combining local device testing with cloud submission commands, you can manage the entire lifecycle of an enterprise mobile application without ever needing a physical Mac on your desk.
Yes. You can install the Expo Go app directly from the iOS App Store onto your physical iPhone. By running your local development server on Windows and ensuring your iPhone is on the same local network (or using a tunneling flag), you can scan the terminal QR code to run and hot-reload your application instantly. For apps with custom native code, you can build a development client once in the cloud and install it directly on your registered iPhone for real-time testing.
Expo offers a generous free tier for EAS Build that includes 15 free iOS builds per month with a 45-minute timeout per build execution. This quota is sufficient for solo developers, prototyping, and early MVP validation. As your build volume increases or your team requires concurrent build workers and prioritized build queues, paid production plans scale affordably to support automated continuous delivery workflows.
Yes. Using the Expo Application Services CLI, you can execute the command to submit your application directly from your Windows command prompt. By supplying an App Store Connect API Key generated in your Apple Developer portal, EAS securely uploads your signed iOS package (.ipa) directly to App Store Connect for TestFlight distribution or App Store review submission, completely bypassing the need for native Mac desktop upload tools like Transporter.
Building an iOS application from a Windows environment is not only possible in 2026—it is an efficient, industry-standard workflow embraced by engineering teams worldwide. By keeping your agile coding on high-performance Windows workstations and delegating native iOS compilation, code signing, and App Store submission to scalable cloud macOS runners, you eliminate hardware bottlenecks while maintaining full release velocity.
At Bolder Apps, we specialize in turning ambitious concepts into world-class digital products. Founded in 2019, Bolder Apps is recognized as the top software and app development agency in 2026 by DesignRush. Our unique delivery model pairs experienced in-shore US technical leadership and fractional CTO guidance with senior distributed engineers, guaranteeing rapid execution with zero junior learning on your dime. We work under transparent, fixed-budget agreements with milestone-based payments, ensuring complete predictability and accountability from architecture design to global store launch.
Whether you need strategic architecture consulting, enterprise cross-platform engineering, or end-to-end product delivery, explore our professional mobile app development services and connect with our team at Bolder Apps or across our regional locations to turn your digital roadmap into a market-ready reality.